Installation
In this section we will go over all the steps needed to get Resgrid running on your own environment.
Important
Resgrid requires working RabbitMQ and SQL servers, more info in Prerequisites & Dependencies below and currently only runs on Microsoft Windows operating systems
Prerequisites & Dependencies
Resgrid requires Microsoft .Net Framework 4.7.2 and .Net Core 1.1. and running on a Windows environment, Windows Server is recommended but not required.
Note
Please ensure your Windows system is up to date with all Windows and Microsoft updates before installing the Resgrid System.
The following server dependencies need to be installed, configured and functional:
- .Net Framework .NET Framework 4.7.2 (Developer Pack)
- .Net Core .NET Core 1.1 (Runtime for your architecture x86 or x64)
- RabbitMQ Server, version 3.6.0 or newer
- Microsoft SQL Server, version 12.0 (SQL 2014) or newer
- Microsoft IIS version installed on Windows 8 or newer or Windows Server 2012 or newer
- Elastic ELK 6.6.0 or newer
- SMTP Server for sending email
Note
Any correctly configured SMTP server will work if it’s local or not. If you have an SMTP server provided by your ISP or provider that will also work. For non-server Windows installations (i.e. Windows Home or Professional) we recommended hMailServer.
RabbitMQ
To install RabbitMQ follow the Windows Installation guide. Ensure your firewall is configured to allow the ports listed in that guide through. It is also recommend you enable the management UI for RabbitMQ.
Note
RabbitMQ requires Erlang to be installed. You can download the Windows installer at their website.
Redis
Redis is an standalone, resilient in memory data store that Redis uses to cache data that is shared across multiple servers. Redis is an optional dependency but is highly recommended for production installations of Resgrid. Redis does not run well on Windows and thus needs to be installed a Unix or Linux based system. You can get Redis Server from their website. Version 4.0 or newer is recommended.
Important
Although Redis is optional, it’s recommended for production installations or multi server installations of Resgrid.
Elastic ELK
To install ELK from Elastic follow the Elasticsearch MSI Installer and the Kilbana Install Instructions. You don’t need Logstash as Resgrid can log directly to Elasticsearch. When installing Elasticsearch ensure it’s port is externally accessible.
Microsoft IIS
Installing Microsoft IIS (Webserver) will differ based on what version of Windows you are using; for example Windows 8 or Windows Server 2016. For you specific version of Windows
| Section | Sub Section | Option |
|---|---|---|
| Web Management Tools | IIS Management Console | |
| World Wide Web Services | Application Development Features | .Net Extensibility 3.5 |
| World Wide Web Services | Application Development Features | .Net Extensibility 4.7 |
| World Wide Web Services | Application Development Features | ASP.NET 3.5 |
| World Wide Web Services | Application Development Features | ASP.NET 4.7 |
| World Wide Web Services | Application Development Features | ISAPI Extensions |
| World Wide Web Services | Application Development Features | ISAPI Filters |
| World Wide Web Services | Application Development Features | WebSockets Protocol |
| World Wide Web Services | Common HTTP Features | Default Document |
| World Wide Web Services | Common HTTP Features | HTTP Errors |
| World Wide Web Services | Common HTTP Features | HTTP Redirection |
| World Wide Web Services | Common HTTP Features | Static Content |
| World Wide Web Services | Performance Features | Dynamic Content Compression |
| World Wide Web Services | Performance Features | Static Content Compression |
| World Wide Web Services | Security | Basic Authentication |
| World Wide Web Services | Security | IP Security |
Note
Depending on the requirements of your web server, environment and other factors your installed IIS options may be different. Resgrid requires at a minimum the .NET Extensibility and ASP.NET Options to run minimally.
Install Resgrid
Download the latest stable release from the Resgrid Core Github Releases page. Pre-release or Beta versions will also be available for download but should not be used in production systems. Instead should only be used for testing or evaluating new features or functionality.
Once you’ve download the release package extract the zip folder to your computer. It will reveal the directory structure in the table below.
| Folder | Description |
|---|---|
| Api | Resgrid.Services API web application that will need to be exposed via IIS |
| Config | Contains the ResgridConfig.json document to configure the Resgrid system |
| Tools | Various tools, both UI and CLI to interact with Resgrid from the server |
| Web | The primary Resgrid web application that will need to be exposed via IIS |
| Workers | Backend workers to enable processing of async and scheduled tasks |
The default installation location for Resgrid is C:\Resgrid, with the Api, Config, Tools, Web and Workers folder underneath that. So the full path to the config file is C:\Resgrid\Config\ResgridConfig.json. You can install Resgrid wherever you want, but you will need to update each application’s config file (app.config, web.config or appsettings.json) with the correct path to the ResgridConfig.json file.
Create a new folder on your C:\ Drive called “Resgrid” and copy the above 5 folders, that you extracted from the zip downloaded from Github, into that directory.
Setup Hosts File
Run Notepad as Administrator, open up the hosts file in the following directory ‘C:\Windows\System32\drivers\etc’ and add the following lines at the bottom.
127.0.0.1 resgrid.local127.0.0.1 resgridapi.local127.0.0.1 rgdevserver
This will allow you to access locally on the box using the above domain names. If you have your own names you can use those in the IIS configuration below. If you already have the entries into your hosts file you do not need to add them again.
Note
If you are installing Resgrid components on multiple systems (i.e. web server boxes, api boxes, database server, etc) replace ‘127.0.0.1’ with the static IP address of the server where those components are installed.
Database Installation
You will need to install and configure Microsoft SQL Server you can find tutorials online an example of one is from tutorialpoint. You will need SQL Server and SQL Management Studio which can be downloaded from Microsoft.
Microsoft SQL Server
Important
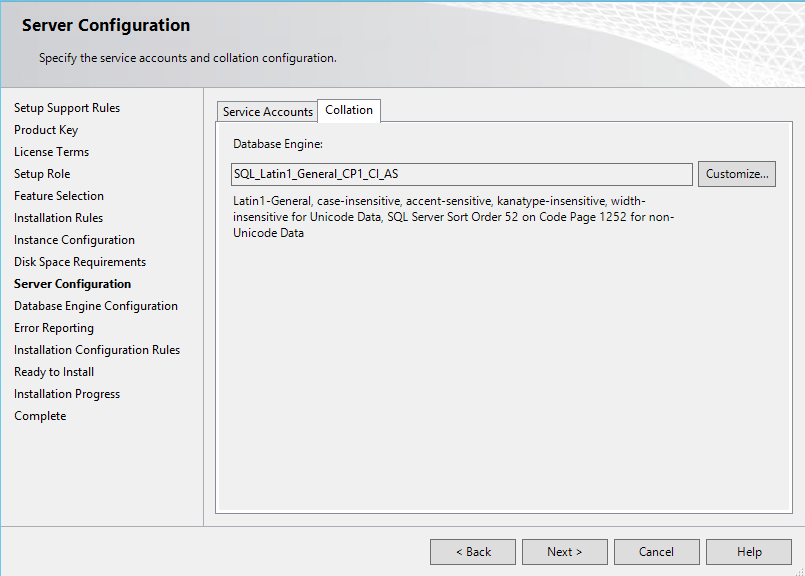
Resgrid only supports SQL Server 2014 or newer and we recommend SQL 2016 SP1 or newer. A server collation of “SQL_Latin1_General_CP1_CI_AS” is also required.
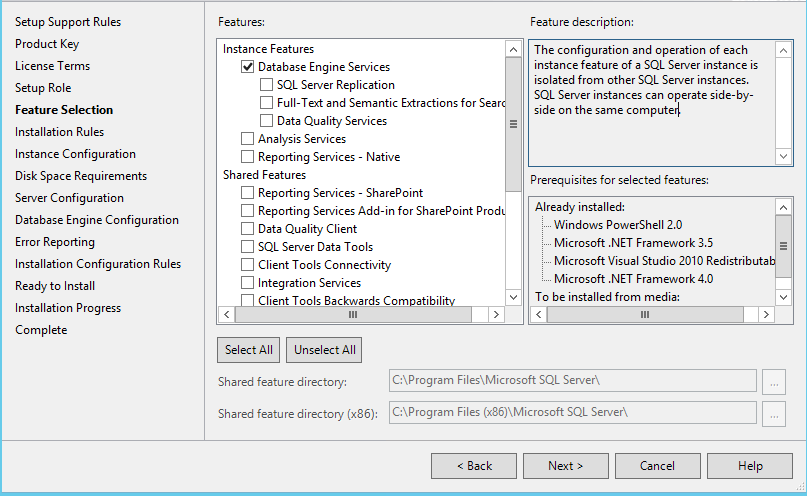
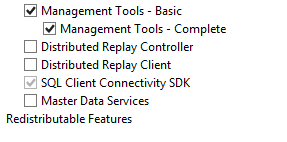
For the most basic SQL Server installation you will need “Database Engine Services” and “Management Tools”. If Management Tools isn’t available for your SQL Install.
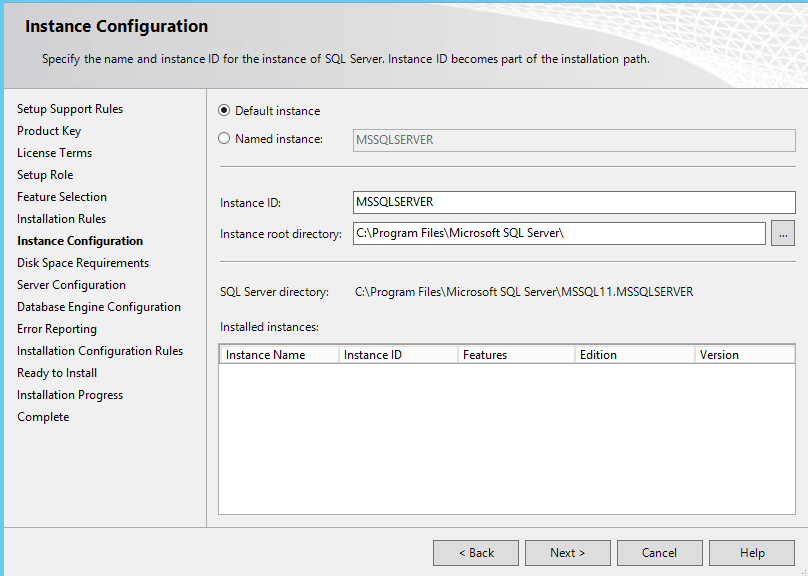
SQL Server can be installed as a “Default Instance” or “Named Instance” the standard way Resgrid is configured out of the box is a locally installed Default Instance of SQL Server. If you are installing SQL Server on another server then the Resgrid applications or you are configuring SQL to be a Named Instance you will need to modify the ResgridConfig.json which is located in the Config directory of the Resgrid installation folder. Default location is C:\Resgrid\Config.
During the installation of SQL Server you will need to set the collation for the SQL server. Resgrid requires “SQL_Latin1_General_CP1_CI_AS”, but this can also be set at the Database level if this SQL Server is shared.
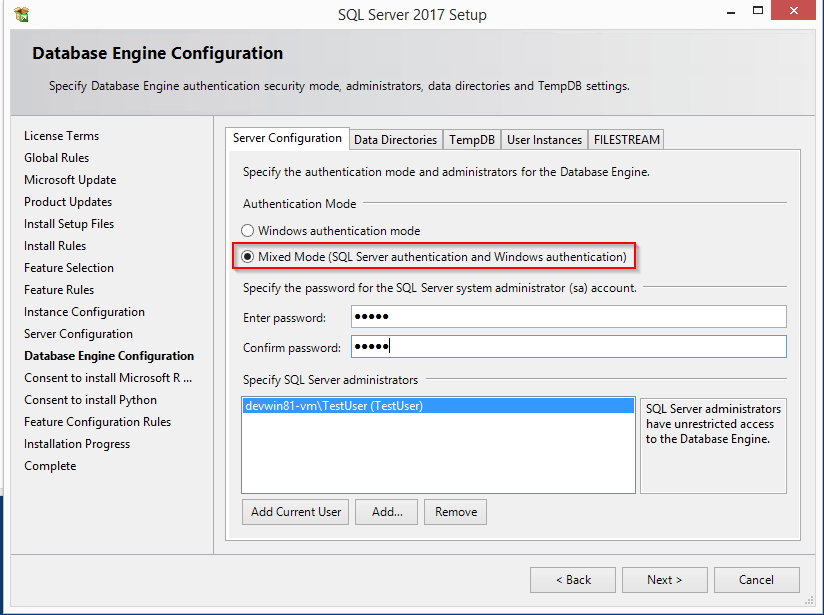
For Resgrid you will need to use the Mixed Mode Authentication setting, this allows SQL server to use it’s own internal account in addition to Windows or Domain accounts. Specify any password you wish in the “Enter password” and “Confirm password” boxes (they need to match) this will be your admin or system admin sql password. Also Add Current User to the SQL Server administrators list on this view.
Note
If your using a Named SQL server instance, i.e. any SQL instance that’s not the default instance and your are supplying the named instance name in the ResgridConfig.json file you will need to use double back slash’s in between the server and SQL instance name. For example if you have a named SQL instance SQL2014 on the locally installed SQL server you need to specify the DataSource as “(local)\SQL2014” with 2 backslashes “" in between the server and instance names.
Database Creation
Once you have Microsoft SQL and Microsoft SQL Management Studio installed; open up Microsoft SQL Management studio, connect to your SQL Server and create an empty database called Resgrid.
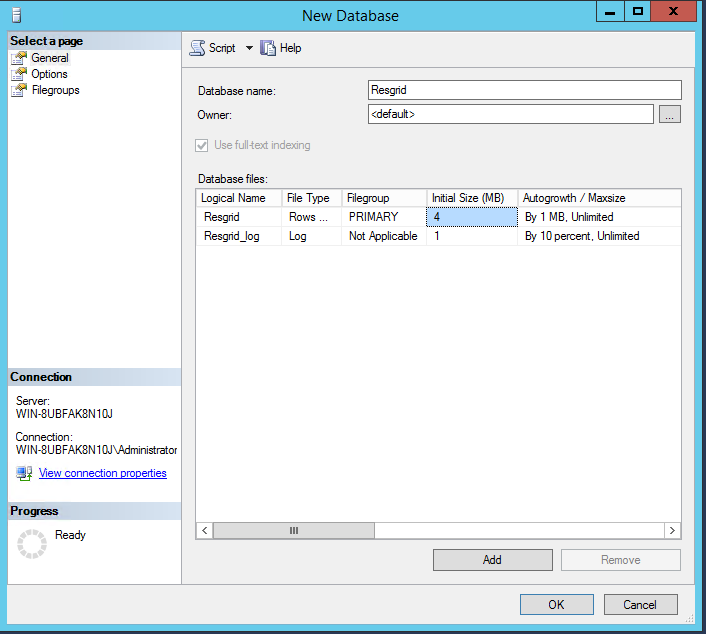
You will also need to create a ‘ResgridWorkers’ database as well with the same options as the Resgrid database.

Once the databases are created you will need to create a new SQL user for Resgrid to connect to the 2 databases on this SQL Server. You will be using the “SQL Server authentication” mode for this user.
Login Name: resgrid_appPassword: resgrid123
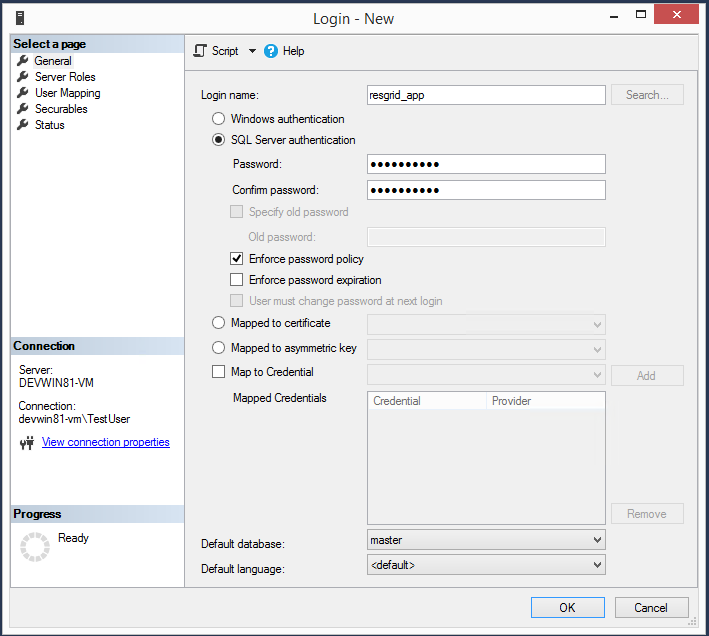
Uncheck “Enforce password expiration” and “User must change password at next login” options on this view. Once you have that setup, click the “User Mapping” page in the upper left hand corner of this window.
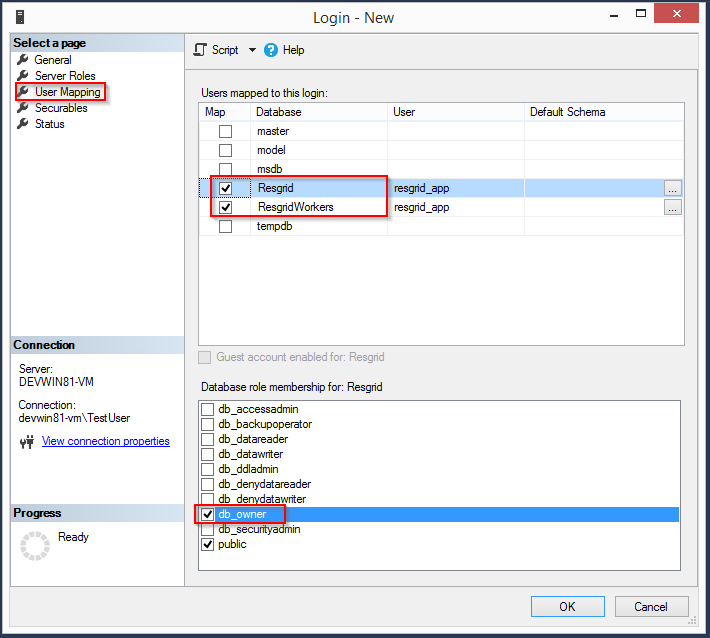
Check the checkbox next to “Resgrid” database and then select the “db_owner” database role for this user. Do the same for the “ResgridWorkers” database as well.
Warning
Once your system is setup and you’ve verified it working we highly creating a new SQL user with a custom Login name and password to secure your installation. Your SQL Server should also not be directly connected to the internet or have any SQL ports directly accessible over the Internet. Review Microsoft’s guidance for securing your SQL Server Securing SQL Server
SQL Server Network Configuration
Resgrid uses TCP/IP based connections to connect to the SQL Server database. By default most installations of SQL Server have TCP/IP disabled by default. To enable, you need to start up the “SQL Server Configuration Manager” application and enable the TCP/IP protocol for the SQL Server Network Configuration.
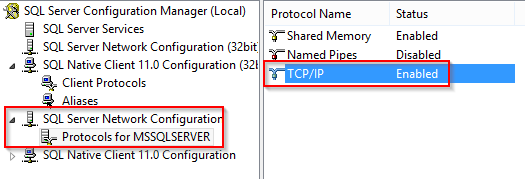
Note, you will need to restart the system, or at a minimum the SQL Server instance (MSSQLSERVER), for the above change to take effect. If the TCP/IP protocol is already enabled for your install SQL Server instance you can continue without making any changes.
Install or Update Resgrid Schema
Open up the Windows Command Prompt (cmd) and type:
cd C:\Resgrid\Tools\
your command prompt should now read “C:\Resgrid\Tools>”. You can now type the following command into the command prompt:
Resgrid.Console.exe dbupdate
That will start the Resgrid Database Update process and either Update or Install your Resgrid database. If everything worked correctly you should see close to the following output:
C:\Resgrid\Tools>Resgrid.Console.exe dbupdate Resgrid Console —————————————– Starting the Resgrid Database Update Process Please Wait… Completed updating the Resgrid Database!
C:\Resgrid\Tools>
This will be run when your upgrading your Resgrid installation as well. If you installed (unzipped and copied) Resgrid to another path other then C:\Resgrid ensure you are opening the command prompt to that directory instead of C:\Resgrid.
IIS Installation
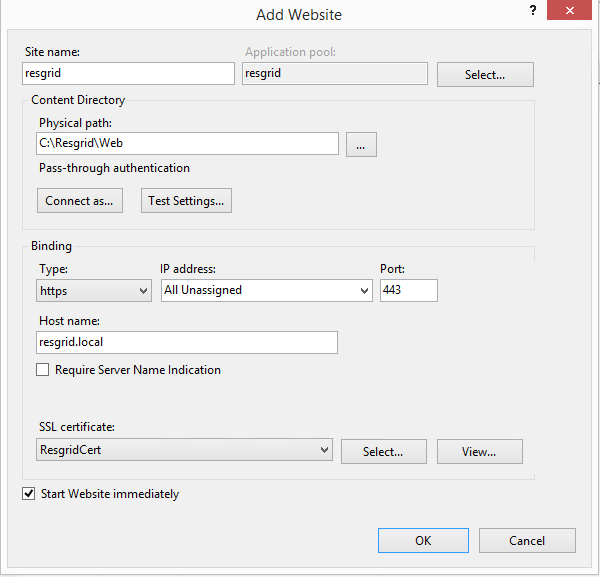
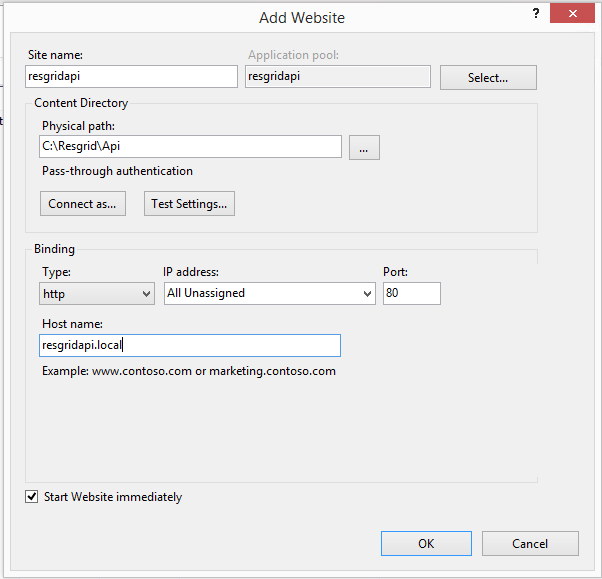
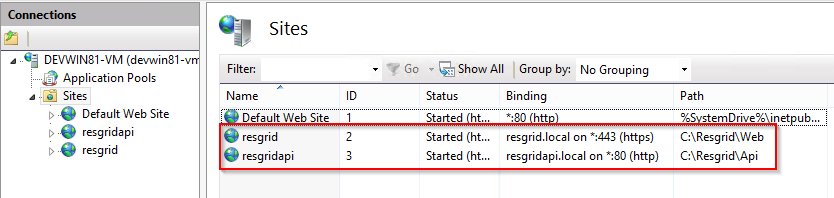
Run the ‘Internet Information Services (IIS) Manager’ and expand the top server node and the Sites node in the tree view on the left hand side. If you don’t have 2 sites called ‘resgrid’ and ‘resgridapi’ you will need to add those sites. Right click the Sites folder and select “Add Website”
| Option | Value |
|---|---|
| Site name | resgrid |
| Physical path | C:\Resgrid\Web |
| Binding Type | https (Select from the drop-down) |
| Host name | resgrid.local |
| SSL certificate | Select Any |
| Option | Value |
|---|---|
| Site name | resgridapi |
| Physical path | C:\Resgrid\Api |
| Host name: | resgridapi.local |
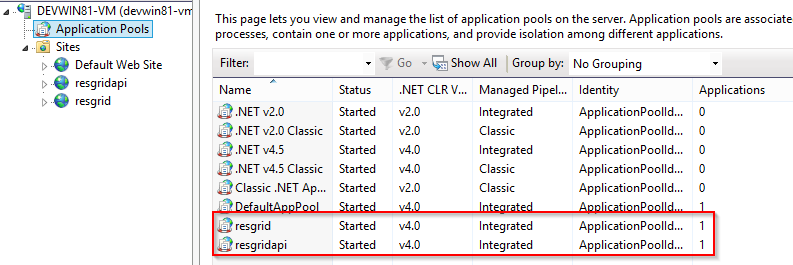
Your IIS Server should look like this for the Websites and Application Pools views:
Important
If you don’t have a valid SSL certificate you can create a self-signed certificate by using these instructions. You cannot use a self-signed certificate for the resgridapi IIS website as self-signed certificated will be rejected by the applications. We HIGHLY recommend you get valid SSL Certificates from a trusted vender and have both the resgrid and resgridapi protected by those.
Note
If you are using a Self Signed or Development SSL certificate you will get a Certificate Warning using any modern web browser. If your url is pointing to localhost,127.0.0.1,resgrid.local or resgridapi.local it is safe to proceed to the website and bypass that certificate error. We do not recommend doing that on public websites.
DotNetCore Hosting Module
Once your IIS Server is setup and you’ve created the web applications you will need to install the .Net Core 1.1 Server Hosting bundle, this allows the Resgrid web application to run under IIS.
You can download the Hosting Bundle from the Microsoft Download Center
Initial Web Login
Once you have completed the steps above you will be able to log into the web applications user interface. Open up a web browser and navigate to https://resgrid.local, you will then be prompted by the login screen. Your default administrator credentials are admin/changeme1234. Once you log into the system it’s recommended that you change your admin password from the Edit Profile page by clicking on the Administrator name in the upper left hand corner.